PIN HOLE CAMERA.
Pinhole photography ingredients:
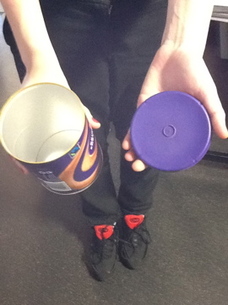
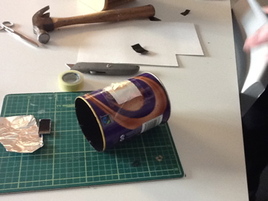
1x container
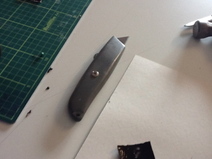
1x sharp knife
duct tap
sharp thin pin
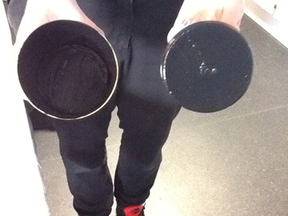
black matt paint and brush
tin foil
a pair of scissors (if needed)
MAKE YOUR OWN PIN HOLE CAMERA.
step one
find a suitable container, try to find one with a removal lid and light proof.
step two
paint or spray the inside of your container this will not let no light bounce around which will cause a clear image.
step three
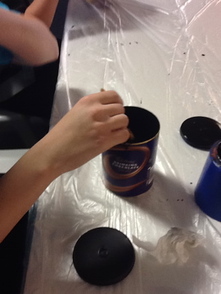
cut a rectangle hole half way through the container (do not hurt yourself)
step four
cut a 2.5 cm square peice of foil ,make sure its smooth. use a pin to create a small hole in the centre of the foil.
step five
Connect the foil to your container making sure the pinhole is over the rectangular hole which you made.
step six
make a shutter flap out of card or tap that can open and close.
step seven
in the dark room (under the red light). cut a piece of photographic paper to fit and place inside your container. it should stay completley still.
step eight
take your pinhole camera out side and find a suitable object,make sure the camera is stable and can not be moved.open up the shutter and expose the paper to the light. your exposure ca be up t 30 seconds or 5 minutes.
step nine
close the shutter at the end of exposure soon and take the camera into the darkroom,remove the paper slowly and place it in to the chemicals.
develop for 1 minute, stop bath for a few seconds, fixative for 5 minutes.
wash the print and hang to dry.
step ten
there are two different ways of making your paper positive or negative.
once you are in the dark room ensure your photo is completely dry get big piece of glass bigger then your paper and another piece of paper the same size as your negative. place the new unexposed paper shinny side up underneath the enlarger.place your negative on top the the glass on both.select an exposure time. expose the image.remove the bottom piece of paper and develop as done before.
In Photoshop:
Scan your paper negative. Import your scanned image into Photoshop. Select image,adjustments and invert. rename your image and transfer it to jpeg.
Well done! You are a super star you have managed to make your own camera. Pat your self on the back (makes it work)
1x container
1x sharp knife
duct tap
sharp thin pin
black matt paint and brush
tin foil
a pair of scissors (if needed)
MAKE YOUR OWN PIN HOLE CAMERA.
step one
find a suitable container, try to find one with a removal lid and light proof.
step two
paint or spray the inside of your container this will not let no light bounce around which will cause a clear image.
step three
cut a rectangle hole half way through the container (do not hurt yourself)
step four
cut a 2.5 cm square peice of foil ,make sure its smooth. use a pin to create a small hole in the centre of the foil.
step five
Connect the foil to your container making sure the pinhole is over the rectangular hole which you made.
step six
make a shutter flap out of card or tap that can open and close.
step seven
in the dark room (under the red light). cut a piece of photographic paper to fit and place inside your container. it should stay completley still.
step eight
take your pinhole camera out side and find a suitable object,make sure the camera is stable and can not be moved.open up the shutter and expose the paper to the light. your exposure ca be up t 30 seconds or 5 minutes.
step nine
close the shutter at the end of exposure soon and take the camera into the darkroom,remove the paper slowly and place it in to the chemicals.
develop for 1 minute, stop bath for a few seconds, fixative for 5 minutes.
wash the print and hang to dry.
step ten
there are two different ways of making your paper positive or negative.
once you are in the dark room ensure your photo is completely dry get big piece of glass bigger then your paper and another piece of paper the same size as your negative. place the new unexposed paper shinny side up underneath the enlarger.place your negative on top the the glass on both.select an exposure time. expose the image.remove the bottom piece of paper and develop as done before.
In Photoshop:
Scan your paper negative. Import your scanned image into Photoshop. Select image,adjustments and invert. rename your image and transfer it to jpeg.
Well done! You are a super star you have managed to make your own camera. Pat your self on the back (makes it work)

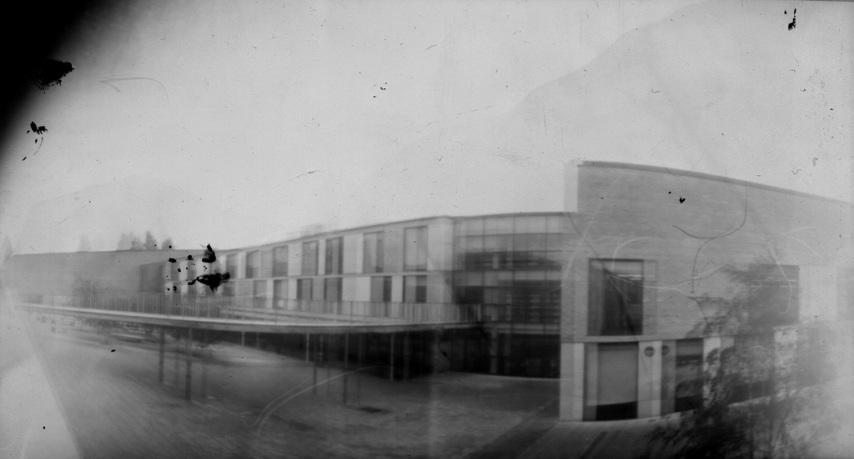
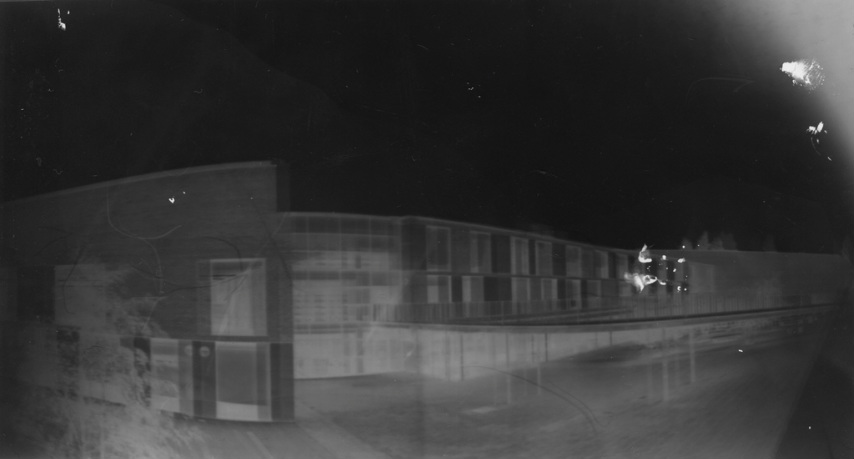
My Pinhole IMage
This photo was taken during photography. I exposed it to the light and this is how it came out.
This is my first attempt that was successful. To do better I would have put the camera at a different angle and exposed it to the light for a little longer so that the image is clearer. I've enjoyed discovering how the pinhole camera works but it was about timing so if I could do it again I would use accurate time.
This is my first attempt that was successful. To do better I would have put the camera at a different angle and exposed it to the light for a little longer so that the image is clearer. I've enjoyed discovering how the pinhole camera works but it was about timing so if I could do it again I would use accurate time.
Negative:
Positive:
I created this by scanning the negative and inverting it in Photoshop. I also flipped it so that the building was facing in the right direction.